


Before you start
KeySigner on iPhone or Mac with Sign-in codes
- Use a disposable GitHub.com personal account. In Settings → Password and authentication, enable two-factor authentication and open the setup QR code. Save the recovery codes before finishing.
- Use a disposable GitLab account with a verified email. Open Edit profile → Access → Password and authentication, then register a one-time password authenticator. Save the recovery codes GitLab gives you.
- Use a disposable Cloudflare dashboard profile. In Profile → Authentication, open Two-Factor Authentication, then add Mobile App Authentication. Have your Cloudflare password available and save the backup codes.
- Use a disposable Bitwarden web vault. In Settings → Security → Two-step login, open Authenticator App settings. Have your master password available and save the recovery code outside this vault.
Data and access
Open the setup QR code
Use the account settings above to open authenticator setup. Keep this browser session open while you test. The QR code contains the secret used to create sign-in codes. Keep it off chat, email and shared storage.
Check. The provider displays an authenticator setup code for the exact test account, and the original session is still active.
Add the account in KeySigner
Open Accounts, then Add (+) and Sign-in codes and backup. Unlock Sign-in codes, choose Add account and select Scan QR code. Choose Review account, check the issuer, account and time-based type, then choose Confirm and add.
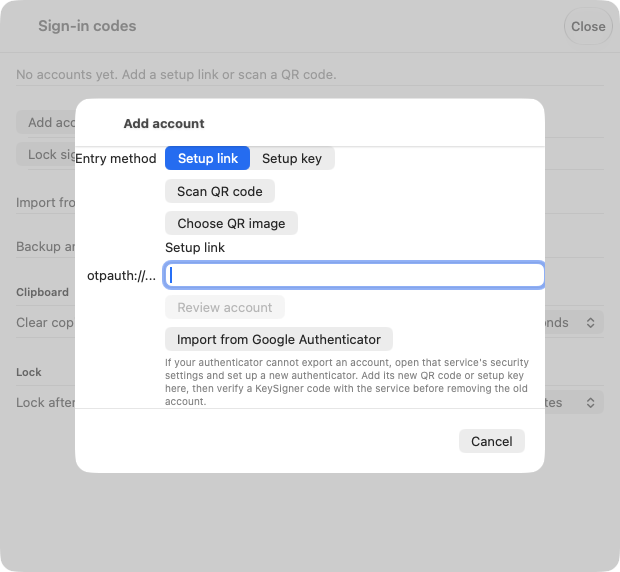
Add account in KeySigner for Mac before scanning a test QR code. View full-size screenshot Check. The saved test entry shows the issuer and account you just reviewed.
Verify the code in the service
Choose Show code next to the test account. If prompted, choose a personal signing rule and enable signer protection. Keep the signers your rule requires available and complete KeySigner approval. Enter the current code in the service’s setup form. Finish enabling the authenticator and save the provider’s recovery codes somewhere you can reach independently of KeySigner and the test account.
Check. The service confirms the authenticator is enabled. You can reach the provider’s recovery material without the test account or KeySigner.
Try a fresh sign-in
With your original session still open, sign in using a separate private browser window. When asked for the authenticator code, approve a fresh code in KeySigner and enter it before it expires.
Check. The private window opens the intended account after it accepts the new code.
Check your result
The service accepts the first code during setup and a fresh code at sign-in. Confirm you can reach the provider’s recovery codes without opening KeySigner or signing in to the test account. The service checks the code. KeySigner checks your rule before showing it.
If you get stuck
The service rejects a fresh code
Check that you chose the matching issuer and account in KeySigner. Turn on automatic date and time, then wait for the next code and try again. If setup was restarted and the service issued a new QR code, use the current QR code. Keep the original session and recovery method available while you check.